Mobile Lab
Overview
Mobile sound laboratory for field research with a focus on experimental work in the field of sound art. The mobile lab is a research unit designed as a vehicle trailer (the size of a caravan) and includes a variety of sound projection and recording capabilities, processing station, and sound system. The Mobile Lab can output sound on up to 12 channels.
Equipment
- Yamaha TF1 digital mixingconsole
- 8x JBL Control 28-L1 Outdoor Speakers
- Audinate Dante AVIO USB to Dante Adapter
- 4x Neumann KH 150 Studiomonitors
- 3x DAP Audio QI-4400 4 Channel Amplifier
- 2x DLINK DGS-1210-28 Smart Managed Switch
Dimensions
- Length (total):7890 mm
- Length (without drawbar): 6260 mm
- Drawbar: 1630 mm
- Width: 2550 mm
- Height: 3055 mm
- Weight: 3200 kg
Ressources
- Mobile Lab Base Ressources
- Blockdiagram Routing Mobile Lab Media: X052BSB V0.pdf
- Dimensions and Floorplan Media: Laborwagen Model.pdf
- Manual TF1 Media: Tf5-manual.pdf
Mixer Routing
The mixer can either be accesed via USB (32 channel plug-and-play) or via Dante. Dante requires a compatible soundcard or Dante Virtual Soundcard(we can provide a shareable license).
| Input CH | Channel Mixer | Out | ASF | VCA Group |
|---|---|---|---|---|
| CH 11 / USB 11 | AUX 11 | Omni 11 / MPO 11 | ABH LH | DCA 1 |
| CH 13 / USB 13 | AUX 13 | Omni 13 / MPO 9 | ABH LV | DCA 1 |
| CH 14 / USB 14 | AUX 14 | Omni 14 / MPO 10 | ABH RV | DCA 1 |
| CH 12 / USB 12 | AUX 12 | Omni 12 / MPO 12 | ABH RH | DCA 1 |
| CH 1 / USB 1 | AUX 1 | Omni 1 / MPO 1 | PA 1 | DCA 1 |
| CH 2 / USB 2 | AUX 2 | Omni 2 / MPO 2 | PA 2 | DCA 1 |
| CH 3 / USB 3 | AUX 3 | Omni 3 / MPO 3 | PA 3 | DCA 1 |
| CH 4 / USB 4 | AUX 4 | Omni 4 / MPO 4 | PA 4 | DCA 1 |
| CH 5 / USB 5 | AUX 5 | Omni 5 / MPO 5 | PA 5 | DCA 1 |
| CH 6 / USB 6 | AUX 6 | Omni 6 / MPO 6 | PA 6 | DCA 1 |
| CH 7 / USB 7 | AUX 7 | Omni 7 / MPO 7 | PA 7 | DCA 1 |
| CH 8 / USB 8 | AUX 8 | Omni 8 / MPO 8 | PA 8 | DCA 1 |
| CH 9 / USB 9 | AUX 9 | Omni 9 / MPO 9 | PAA | DCA 1 |
| CH 10 / USB 10 | AUX 10 | Omni 10 / MPO 10 | PAB | DCA 1 |
| Input CH | Channel Mixer | Out | ASF | VCA Group |
|---|---|---|---|---|
| CH 17 / DANTE 17 | AUX 1 | Omni 1 / MPO 1 | PA 1 | DCA 2 |
| CH 18 / DANTE 18 | AUX 2 | Omni 2 / MPO 2 | PA 2 | DCA 2 |
| CH 19 / DANTE 19 | AUX 3 | Omni 3 / MPO 3 | PA 3 | DCA 2 |
| CH 20 / DANTE 20 | AUX 4 | Omni 4 / MPO 4 | PA 4 | DCA 2 |
| CH 21 / DANTE 21 | AUX 5 | Omni 5 / MPO 5 | PA 5 | DCA 2 |
| CH 22 / DANTE 22 | AUX 6 | Omni 6 / MPO 6 | PA 6 | DCA 2 |
| CH 23 / DANTE 23 | AUX 7 | Omni 7 / MPO 7 | PA 7 | DCA 2 |
| CH 24 / DANTE 24 | AUX 8 | Omni 8 / MPO 8 | PA 8 | DCA 2 |
| CH 25 / DANTE 25 | AUX 9 | Omni 9 / MPO 9 | PAA | DCA 2 |
| CH 26 / DANTE 26 | AUX 10 | Omni 10 / MPO 10 | PAB | DCA 2 |
| CH 27 / DANTE 27 | AUX 11 | Omni 7 / MPO 7 | ABH LH | DCA 2 |
| CH 28 / DANTE 28 | AUX 12 | Omni 8 / MPO 8 | ABH RH | DCA 2 |
| CH 29 / DANTE 29 | AUX 13 | Omni 9 / MPO 9 | ABH LV | DCA 2 |
| CH 30 / DANTE 30 | AUX 14 | Omni 10 / MPO 10 | ABH RV | DCA 2 |
Speaker Setup Innen
Basic Ambisonic Template for 4 channel mixing can be found here:
| Lautsprecher | Azimuth | Azimuth Elevation | Mixer Channel (Dante) | Mixer Channel (USB) |
|---|---|---|---|---|
| ABH LV | -30° | 0° | CH 29 | CH 13 |
| ABH RV | 30° | 0° | CH 30 | CH 14 |
| ABH RH | 130 | 0° | CH 27 | CH 11 |
| ABH LH | -130° | 0° | CH 28 | CH 12 |
Working with the Mobile Lab
The center piece for routing sound inside the Mobile Lab is a Yamaha TF1 digital mixing console. Different presets are already prepared for different routing options for different scenarios including:
- Multichannel Output
- Quadrophonic Mixdowns
- Recording
Depending on the preset routing will be different and you actually dont need to further interact with the mixing console beside loading the corresponding preset. See the channel list of each preset where you need to sound audio to get output.
Presets
AESR USB|Dante:
- Channel 1 - 12 USB
- Channels 17-28 Dante
- DCA 1 acts like a masterfader for all USB & Dante channels
- Purpose: Multichannel Routing
- All USB channel are also sent to ABH LV/RV
| Input | Mixer Channel | Channel Name | Output | ASF | DCA Group |
|---|---|---|---|---|---|
| USB 1 | Ch 1 | PA1(USB) | Omni 1/MPO 1 | PA1 | DCA 1 |
| USB 2 | Ch 2 | PA2(USB) | Omni 2/MPO 2 | PA2 | DCA 1 |
| USB 3 | Ch 3 | PA3(USB) | Omni 3/MPO 3 | PA3 | DCA 1 |
| USB 4 | Ch 4 | PA4(USB) | Omni 4/MPO 4 | PA4 | DCA 1 |
| USB 5 | Ch 5 | PA5(USB) | Omni 5/MPO 5 | PA5 | DCA 1 |
| USB 6 | Ch 6 | PA6(USB) | Omni 6/MPO 6 | PA6 | DCA 1 |
| USB 7 | Ch 7 | PA7(USB) | Omni 7/MPO 7 | PA7 | DCA 1 |
| USB 8 | Ch 8 | PA8(USB) | Omni 8/MPO 8 | PA8 | DCA 1 |
| USB 9 | Ch 9 | PAA(USB) | Omni 9/MPO 9 | PAA | DCA 1 |
| USB 10 | Ch 10 | PAB(USB) | Omni 10/MPO 10 | PAB | DCA 1 |
| USB 11 | Ch 11 | PAL(USB) | Omni 11/MPO 11 | PAL | DCA 1 |
| USB 12 | Ch 12 | PAR(USB) | Omni 12/MPO 12 | PAR | DCA 1 |
| Dante 17 | Ch 17 | PA1(DA) | Omni 1/MPO 1 | PA1 | DCA 1 |
| Dante 18 | Ch 18 | PA2(DA) | Omni 2/MPO 2 | PA2 | DCA 1 |
| Dante 19 | Ch 19 | PA3(DA) | Omni 3/MPO 3 | PA3 | DCA 1 |
| Dante 20 | Ch 20 | PA4(DA) | Omni 4/MPO 4 | PA4 | DCA 1 |
| Dante 21 | Ch 21 | PA5(DA) | Omni 5/MPO 5 | PA5 | DCA 1 |
| Dante 22 | Ch 22 | PA6(DA) | Omni 6/MPO 6 | PA6 | DCA 1 |
| Dante 23 | Ch 23 | PA7(DA) | Omni 7/MPO 7 | PA7 | DCA 1 |
| Dante 24 | Ch 24 | PA8(DA) | Omni 8/MPO 8 | PA8 | DCA 1 |
| Dante 25 | Ch 25 | PAA(DA) | Omni 9/MPO 9 | PAA | DCA 1 |
| Dante 26 | Ch 26 | PAB(DA) | Omni 10/MPO 10 | PAB | DCA 1 |
| Dante 27 | Ch 27 | PAL(DA) | Omni 11/MPO 11 | PAL | DCA 1 |
| Dante 28 | Ch 28 | PAR(DA) | Omni 12/MPO 12 | PAR | DCA 1 |
AESR Dante|USB
- Same as above but Dante Channels are switched around from: Dante 1-12, USB 17-28 #### AESR USB|Analog
- Setup for using analog inputs for routing, suitable for setup using other soundcards than the TF1
- Channels 1-12 USB In
- Channels 17-28 Analog Ins (AN 1-12)
| Input | Mixer Channel | Channel Name | Output | ASF | DCA Group |
|---|---|---|---|---|---|
| USB 1 | Ch 1 | PA1(USB) | Omni 1/MPO 1 | PA1 | DCA 1 |
| USB 2 | Ch 2 | PA2(USB) | Omni 2/MPO 2 | PA2 | DCA 1 |
| USB 3 | Ch 3 | PA3(USB) | Omni 3/MPO 3 | PA3 | DCA 1 |
| USB 4 | Ch 4 | PA4(USB) | Omni 4/MPO 4 | PA4 | DCA 1 |
| USB 5 | Ch 5 | PA5(USB) | Omni 5/MPO 5 | PA5 | DCA 1 |
| USB 6 | Ch 6 | PA6(USB) | Omni 6/MPO 6 | PA6 | DCA 1 |
| USB 7 | Ch 7 | PA7(USB) | Omni 7/MPO 7 | PA7 | DCA 1 |
| USB 8 | Ch 8 | PA8(USB) | Omni 8/MPO 8 | PA8 | DCA 1 |
| USB 9 | Ch 9 | PAA(USB) | Omni 9/MPO 9 | PAA | DCA 1 |
| USB 10 | Ch 10 | PAB(USB) | Omni 10/MPO 10 | PAB | DCA 1 |
| USB 11 | Ch 11 | PAL(USB) | Omni 11/MPO 11 | PAL | DCA 1 |
| USB 12 | Ch 12 | PAR(USB) | Omni 12/MPO 12 | PAR | DCA 1 |
| Analog 1 | Ch 17 | PA1(AN) | Omni 1/MPO 1 | PA1 | DCA 1 |
| Analog 2 | Ch 18 | PA2(AN) | Omni 2/MPO 2 | PA2 | DCA 1 |
| Analog 3 | Ch 19 | PA3(AN) | Omni 3/MPO 3 | PA3 | DCA 1 |
| Analog 4 | Ch 20 | PA4(AN) | Omni 4/MPO 4 | PA4 | DCA 1 |
| Analog 5 | Ch 21 | PA5(AN) | Omni 5/MPO 5 | PA5 | DCA 1 |
| Analog 6 | Ch 22 | PA6(AN) | Omni 6/MPO 6 | PA6 | DCA 1 |
| Analog 7 | Ch 23 | PA7(AN) | Omni 7/MPO 7 | PA7 | DCA 1 |
| Analog 8 | Ch 24 | PA8(AN) | Omni 8/MPO 8 | PA8 | DCA 1 |
| Analog 9 | Ch 25 | PAA(AN) | Omni 9/MPO 9 | PAA | DCA 1 |
| Analog 10 | Ch 26 | PAB(AN) | Omni 10/MPO 10 | PAB | DCA 1 |
| Analog 11 | Ch 27 | PAL(AN) | Omni 11/MPO 11 | PAL | DCA 1 |
| Analog 12 | Ch 28 | PAR(AN) | Omni 12/MPO 12 | PAR | DCA 1 |
AESR Rec
- For recording and 4 channel monitoring
- DCA 1 Computer Monitor
- DCA 2 Input Monitoring
- Direct Input Monitoring
- Recording Inputs will be available Starting at Channel 17 (Analog In = USB 17 In)
| Input | Mixer Channel | Channel Name | Output | ASF | DCA Group |
|---|---|---|---|---|---|
| USB 1 | Ch 1 | PC L | Omni 13MPO 13 | ABH LV | DCA 1 |
| USB 2 | Ch 2 | PC R | Omni 14/MPO 14 | ABH RV | DCA 1 |
| USB 3 | Ch 3 | PC LH | Omni 11/MPO 11 | ABH LH | DCA 1 |
| USB 4 | Ch 4 | PC RH | Omni 12/MPO 12 | ABH RH | DCA 1 |
Reaper

The AESR Lab provides a ready made Reaper-Template that can pan 8 soundsources to any speaker attached to the mobile lab. You can find it here.
If you are looking for a way create your own multichannel routing template, or modify the existing one, we have created an guide here:
Basic Setup
- Create a new track (CTRL + t) "Track" > "Insert new track"
- To be able to adress all 8 channels of the mobile lab, change the track channel count to 8 channels via "Route" > "Track channels"
- Now we add a plugin called "ReaSurround" on your newly created channel. "ReaSurround" will enable us to route the sound via a graphic interface to the respective channels in realtime
- Before we can start routing we should adapt the speaker configuration fitting the speaker layout of the Mobile Lab. There is a ready made preset you can find here: Then import "8chReadSurround.rpl" preset library into the Plugin, this will already setup a good speaker configuration to work with the Mobile Lab
- We now also need to change the track channel count on our master track to handle 8 channels. We will use this master track to send our differently panned sound sources to the correct hardware outputs. Do this by clicking on the "Sends/Hardware Outputs" Section on your Master Track and add a new hardware output. You can find the output configuration inside this chart #Mixer Routing
- Now you are ready to go to route your sound to the speakers of the Mobile Lab using ReaSurround
Audio Routing with ReaSurround
- The interface of "ReaSurround" let's you visually move a sound source to different speakers. After you loadup the preset you will see a speaker configuration setup with 8 speakers (yellow) and a white dot which is your sound source. By clicking and dragging your soundsource you can move the sound to the respective speaker.
- Using "Diffusion" you can make your sound source bigger covering a lager area of speakers
Automation and Modulation
Reaper let's you automate any paramter inside of the software, as well as using modulator like LFOs to control plugin and software parameters. To be able to create automation we have to enable the automation envelope of the corresponding track.
- Click "Trim" on the track
- Enable the parameters you want to automate by clicking "Arm" and "Visible"
- A new envelope should appear under the track, where you can draw in your automation
- Clicking on "Mod" opens a window where you can set LFOs or an audio signal as a modulation source
Open Sound Control
Reaper can be controlled via open sound control so you can control your reaper session via an OSC Controller (TouchOSC, PD, OSC Controller, MAX/MSP)
| Parameter | OSC Message | Datatype |
|---|---|---|
| Track Volume | /track/@/volume | (float 0-1) |
| FX Parameter (ReaSurround X) | /track/@/fx/1/fxparam/6/value | (float 0-1) |
| FX Parameter (ReaSurround Y) | /track/@/fx/1/fxparam/7/value | (float 0-1) |
| FX Parameter (ReaSurround Diffusion) | /track/@/fx/1/fxparam/10/value | (float 0-1) |
Controlling Reaper with an IPad
AESR provides a Touch OSC template that can already setup to control the AESR Mobile Lab Reaper Template via OSC. This template enables you to route 8 channels of audio to different speakers of the Mobile Lab in realtime.
Preliminary Steps
- Log into IPad (Code: 2468)
- Start Touch OSC
- Make sure that the computer and the Ipad are on the same network

Get the IP Adress of your computer:
- Windows:
- . Open the Command Line ([Windows] + [R] enter “cmd”)
- Enter
ipconfig - Note IP-Adress under the network interface that you are using to connect to the network
- Mac OS:
- Press “Alt” and right-click on the Wifi Symbol
- You should see your IP-Adress inside the context menu
- Linux:
- Enter the commandline and type:
ip a - Note IP-Adress under the network interface that you are using to connect to the network
- Enter the commandline and type:
Edit Touch OSC Settings
- Switch to Editing Mode
- Switch to Connections Tab
- Go to OSC Settings Tab
- Enter IP-Adress of host (your computer)
- Choose a send port, that is not in use by another software (eg. 1234, 7777, 8888, 2562)
- Set port in Reaper via Options > Preferences > Control/OSC/Web
- Add Control Surface > Control Surface Mode: OSC (Open Sound Control)
- Chose Mode "Local Port"
- Set port to port number set in TouchOSC Settings
-
 1. Editing Mode
 -
 2. Connections Editor
 -
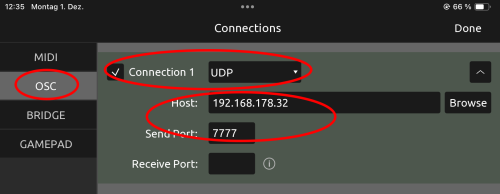 3., 4., & 5. Settings for Host-IP, Protocol and Port
 -
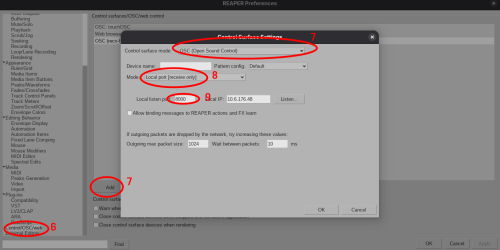 Reaper Settings (Steps 6,7,8,9)


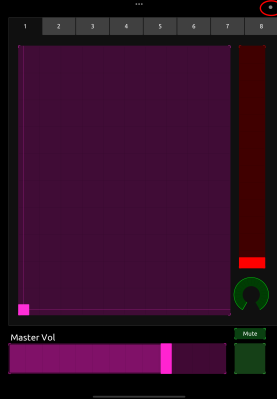
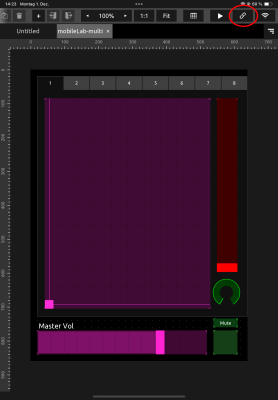
Touch OSC Template Overview

- Selection of one of eight tracks
- X/Y Routing Position of currently selected track
- Track volume
- Track Diffusion (perceived Size of sound)
- Master Volume
- Mute Master
Ableton Live

The AESR Lab provides a ready made Live-Template that can pan 8 sound sources to any speaker attached to the mobile lab. You can find it here.
If you are looking for a way create your own multichannel routing template, or modify the existing one, we have created an guide here. Please notice that Live has no native multichannel support and needs M4L to enable multichannel.

Setup
- To be able to utilize multichannel routing you will need a M4L external called "Surround Panner". You can find it here or in our Resources Folder
- Put onto a track you want to use for multichannel output
- Select "Speaker Setup" "8-Center"
- Select Outputs "1/2 > Ext.Out > 1/2, 3/4 > Ext.Out > 3/4, etc"
- Add "Surround Panner" to more tracks if you need to
- Use the graphical interface to move the sound around, you can use the focus parameter to expand the speaker range of the sound source or to make it smaller